
Andy Hendersons review of his building of the Class 41, 6xx
Got the etches at the same time as my 22 (early October '05) and the etch quality is superb and very crisp & precise - as usual.
Again, this is not an "easy build" kit as with the 22, you have to build everything up from layered etches - and more, as I found out
I had intended for her to ride on a modified LifeLike/Atlas E7 or E8 chassis, but the bogies are much too short, so it will be a Farish class 47/50 chassis.
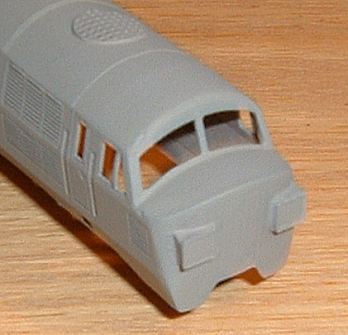
OK, started assembling the body. The nose pieces are slightly different from
the 22 in that they need to be curved slightly and more-so to 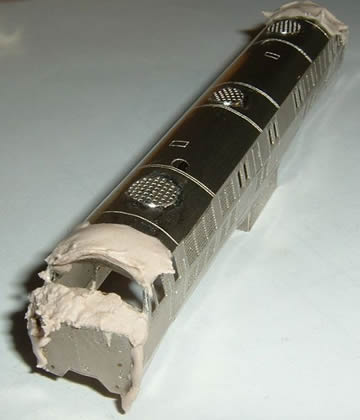 the top corners. This is quite tricky to do, and making the body stay in place
while you solder the nose-end in place requires 3 hands :o) That done, it
is clear there is going to be a lot more filling on this beast than the 22
- to be expected really so don't be distraught, there is a limit on how much
curved body you can make from flat etches. But... Allen has very cleverly
allowed for this in that in their flat state, the nose ends are too wide.
They need to be curved very gently in order to take up their proper dimensions.
Nice. The bonnet roof is fiddly, in the end I decided to solder a flat brace
from side to side and fill the top with P38. Same with the cab roof. This
gives easier construction and a lovely smooth transition in body line. Of
course the purist would fill with solder, but I just love finishing with P38
- so controllable. My kit soldering skills have come-on great guns. I can
take greater liberties with the medium because I now understand and have experience
of how it will behave. Consequently, even though this is a degree or two more
complicated-a-kit. I had the body to this stage in only three hours, and I
even soldered the extractor grills in place instead of super glue like on
the 22. The solder just loves this metal, it flows so easily and even the
tiniest bit can wick along a seam by dragging the soldering iron bit. Really
nice medium to work in.
the top corners. This is quite tricky to do, and making the body stay in place
while you solder the nose-end in place requires 3 hands :o) That done, it
is clear there is going to be a lot more filling on this beast than the 22
- to be expected really so don't be distraught, there is a limit on how much
curved body you can make from flat etches. But... Allen has very cleverly
allowed for this in that in their flat state, the nose ends are too wide.
They need to be curved very gently in order to take up their proper dimensions.
Nice. The bonnet roof is fiddly, in the end I decided to solder a flat brace
from side to side and fill the top with P38. Same with the cab roof. This
gives easier construction and a lovely smooth transition in body line. Of
course the purist would fill with solder, but I just love finishing with P38
- so controllable. My kit soldering skills have come-on great guns. I can
take greater liberties with the medium because I now understand and have experience
of how it will behave. Consequently, even though this is a degree or two more
complicated-a-kit. I had the body to this stage in only three hours, and I
even soldered the extractor grills in place instead of super glue like on
the 22. The solder just loves this metal, it flows so easily and even the
tiniest bit can wick along a seam by dragging the soldering iron bit. Really
nice medium to work in. 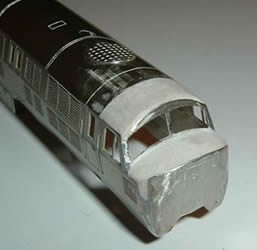
"Santa Claus is coming to town"
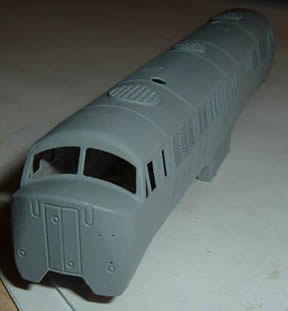
Having let the P38 set fully (1 hour at least) I cut away the large excess with a scalpel and filed down to profile. I only had two shallow bits, so built those up a second time and filed down. Finally a smooth all over with 800 grit wet & dry (used dry) gets me to this stage:
For some reason, I could see all the highs and lows without priming - dunno why here and not with the 22... maybe coz its 3pm not 4am :o) Then followed a coat of red primer to seal it all... and the final grey coat of primer ready for the rail blue all over:
... very happy bunny.
It is unmistakable as a NBL Warship. Items still to do are the headcode boxes and pick some of the finer detail clear of filler/primer. Put the handrails on.
The headcodes are provided with the kit but look a tad flat. Pictures show they are a prominent (to the point of intrusive) feature of the nose-end detail. I am going to build these up with four tiny squares of milliput and the glue the headcode etch on top - this will allow me to get it all "just right"
More piccies as she progresses... have to get a move on, got two really nice diesels on the go at the same time. Blimey it's getting like a production line.
I can honestly say that thus far, I have not enjoyed making, nor been so pleased with any other kit I have built from scratch. I hope my hunch about a 74 from Worsley comes to fruition - I know I will end up with two cracking SR electrics and have a fun & satisfying time getting there. Can't wait!
 OK,
finally got round to doing the headcodes... I couldn't find any measurements
for the positioning of these so I judged it by eye - think it's OK.
OK,
finally got round to doing the headcodes... I couldn't find any measurements
for the positioning of these so I judged it by eye - think it's OK.
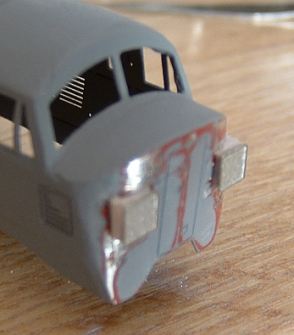
I did say I was going to build these up with milliput - tried, failed. Couldn't get such a tiny area to "take" very well so I built up the areas for the headcode boxes with P38. These don't have to be very accurate - so long as they don't swamp the front end. They are only going to act as a platform to take the etch. Two shots here show "as applied but trimmed" and then filed down to the correct "protruberence" and rough outline. It is important not to file away the front end detail when doing the sides!
The Etches are now glued to the flat front of the platform. They provide the correct outline to trim the P38 to. Starting to look nice now - I think I have got them about right. It is so important to get piccies of the real thing. I could have made such a hash of the headcodes without.
Now, I can see where I have to fill and file to get the profile of the boxes snug to the nose end. Let the superglue set fully - it will go off very quickly (about 10 seconds) after applying the etch to the top of the platform but leave it somewhere warm for an hour to fully cure. Worsley Works do provide spare headcode etches with the kit but even so, it is distressing to have one ping-off into the workshop coz you thought it was stuck properly (voice of very recent experience :o) Mix up a lean mix of P38 and scrape it into place with the side of a scalpel. This will set slower and give you time to do this microscopic job without being rushed. The less you put on, the less you are going to have to remove later, but don't try and mix a tiny amount - you'll never get the proportions right and it usually ends up being an aggressive mix that sets before you have finished filling properly.
Well, dunno about you, but I think it's about there. 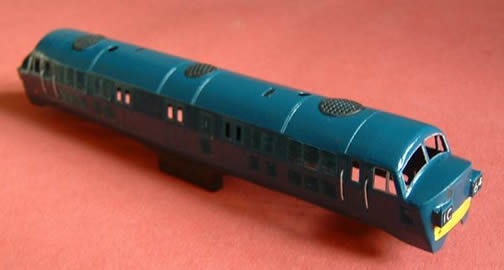
And here she is, very close to completion. Headcodes, yellow panel and marker lights added. I am not happy with the two oval horn grills. They form part of the prominent nose detail and to just have them flat like I have here is a detraction from that. Gotta get something this small that is raised slightly. I might ask Allen to etch me a few of these and glue them in place.
"..........Allen will do them"
Well that is about it for now. I have to get decals applied and find a donor chassis and then I will be the proud & happy owner of a nice example of the class. Still can't believe none of them got preserved - what a loss.
So what do I think of her? Generally I am over the moon. If I were starting again, I would try to get the transition from nose-end to the top of the bonnet a little less sharp and more curved. Whereas I think this is a really nice example, the plans I have show a slightly more curved profile, but this is down to me and not the kit.
What a rarity! What a beast! Very, *VERY* happy :o)))))))