| each of the four brake cylinders, at the end of the frames. I am unsure of its rôle, but for modelling purposes it was represented by a short piece of styrene rod glued in place. Another ‘mystery’ item is the infilling of the space between the base of the rear steps and the lifting point. A small block of styrene served this purpose. Little comment is needed on the sandpipes; 0.15mm brass wire was used. But it should be noted that the direction of the sandpipes is significant. As originally built for service on the Matheran line, the locos had the sandpipes directed to the leading edge of both wheels, since the locos always operated hood first, with the cab at the rear, there being a loop at Matheran where the locos turn for the return trip. However, when they were assigned to the Darjeeling line the sandpipes were arranged to feed to the outer end of the wheels, as the locos are not turned at Darjeeling and normally operate cab leading on the downhill return trip, even though sanding is unlikely to be needed on this run. As my loco was to be in Darjeeling livery, the choice was sandpipes to either end. | 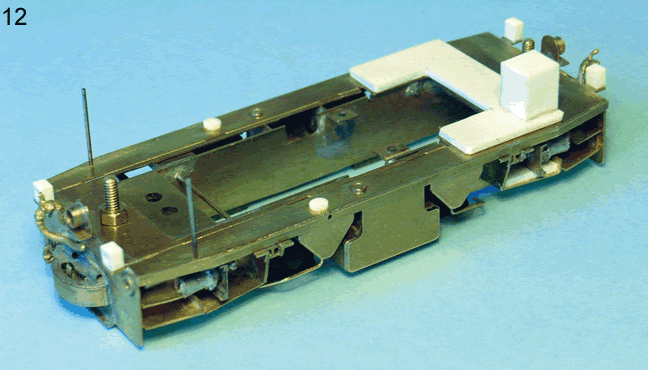 |
|
| 12. The plastic items used
(after all soldering is completed) include lamps, sandbox fillers, cab floor and seat, as well as the various elements on the frame. |
||
| Couplings
To achieve this I use a hinged loop of wire above the buffing plate, with a small vertical tongue soldered to the inside edge of the buffer, on which the loop from the adjacent vehicle catches after riding up over it when vehicles are brought together. Automatic coupling is not always reliably achieved, but the vehicles can be easily coupled and uncoupled by hand, and it avoids the visual intrusion that could result from a proprietary coupling being fitted on such a tiny model. The hinge for the wire loop is made from a short length of fine brass tube, the centre section of which has been opened up with a file. The wire loop is made in an omega shape and then sprung into the ends of the tube – a simple, effective and unobtrusive coupling mechanism.; |
|
|
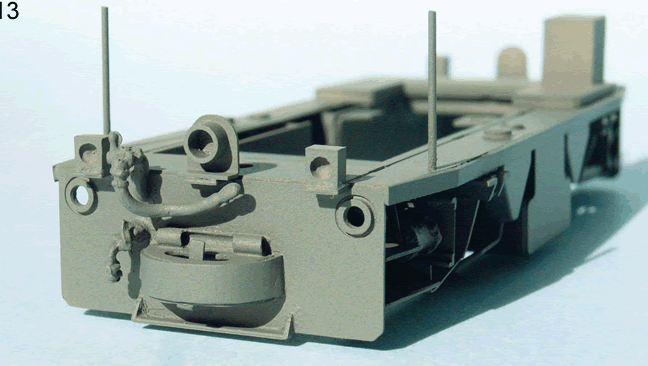
| 13. To make a simple unobtrusive
coupling, a piece of tube, opened up at the centre, is soldered at the back of the buffing plate, and a short tongue is soldered upright behind the front of the buffing plate. An omega loop of steel wire (not shown here) is then sprung into the tube, and thus hinged, the wire loop can ride up over the tongue on the adjacent vehicle and couple. Also seen are the brake hose connections and the lamps |
||
| Painting and assembly
This was where the strategy of making the chassis, footplate, and body as separate units paid dividends. Grey etch primer was sprayed on all items except the power unit. The footplate and chassis were both sprayed with a dirty black, and it would have been difficult to get paint to the deep recesses of the chassis detail if the footplate had been integral with the chassis. Once painted and weathered, the footplate and chassis were lightly glued together to simplify subsequent assembly to the body, (but this is not essential as the chassis, footplate, and body are all firmly connected together by the bolts at front and rear). Applying the lettering on the footplate edge and sandboxes and fuel tanks was maddening. The lettering is very small and I used an N scale decal sheet by Microscale. Making up the words ‘sand’ and ‘fuel’ from separate decal letters each about 0.5mm high is no fun – the surface tension of the
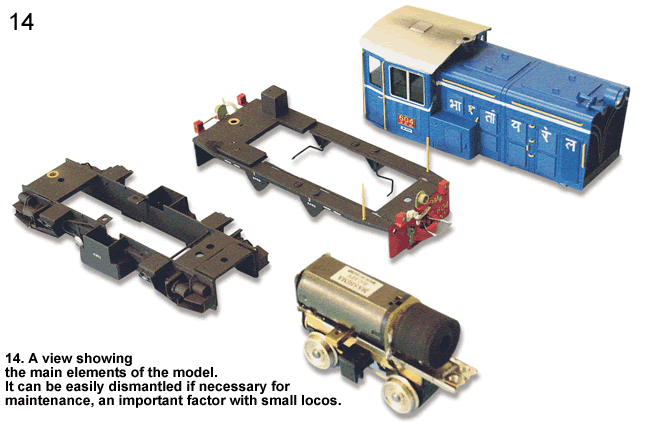
|
|
|
| 804 | CONTINENTAL MODELLER | |
| Next Page | ||
|
|
||