| 267 | ||
|
After struggling on many such vehicles I have now worked out that if you fit one support at each end, you can adjust the position of the footstep until all is well, then solder in the other supports. I know it is obvious but it took me 30 years to learn that trick, so I will pass it on in case anybody else is as daft as I am! When it came to painting and lettering, I was pleased to find suitable transfers on the HMRS sheet that covers the Midland Railway. They provide First, Third and Guard's door wording as well as the LT&SR waist lettering, numbers and crests. The only thing they didn't provide was the 'Second' door lettering. Rather than match my hand lettering against transfers (Gold is an awful colour to match), I had a look at what I had in my transfer drawer and found some GWR 'Seconds'. These were used with some black shading added with mapping pen and acrylic black ink. The livery is an area where I disagree with the published material. All the references talk about the LT&SR carriage livery being varnished teak, but the photos show a dark, solid colour with no trace of graining. In the absence of any alternative, my customer and I discussed and agreed that we would go for a medium/dark brown colour. As I said earlier, I know next to nothing about the LT&SR but I was provided with a colour photo of a carriage crest transfer (or perhaps it was hand painted?). The real crest is presented on a dark green background and I wouldn't be at all surprised to find out one day that the early carriage livery was this colour. Why mount a crest on a background that doesn't represent the carriage colour? Other crests I have seen have always been on a 'carriage coloured' background. So maybe they will need a fresh coat of paint when the truth emerges, but for now, they are brown, with red ends on the brake carriages. A Tamiya acrylic brown was used. I can't recall the exact colour but it was something to do with the Japanese Navy or some such organisation. A couple of coats of johnson's 'Klear', applied after the transfers, lifted the finish from a dead matt to something between satin and full gloss. When you look at photos from the period, you can see many reflections in carriage paintwork, so that sort of finish is quite appropriate. As they are to run as a fixed rake, I made up a dummy screw coupling from wire and soldered it to one coupling hook. The dummy couplings stick out horizontally and the end loop drops over the hook of the adjacent carriage. This arrangement works well as long as it is not expected to cope with small radius curves, and it has the advantage that the whole rake moves together when the loco pulls away. It is a pet hate of mine to see a passenger train moving off one carriage at a time like a loose-coupled goods! The ends of the brake carriages have Masokits screw couplings, which are my choice for working couplings as the pins can be soldered through the links for strength and they dangle nicely! |
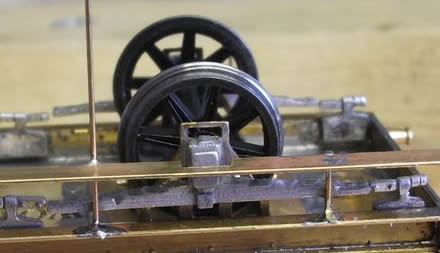
This illustrates my method of attaching the lower
footsteps. 0.45mm brass wire is bent at 90 degrees and soldered to the
bottom of the upper footstep. One support is made at each end of the
carriage and the lower step is attached to these. The intermediate supports
are soldered in afterwards, once the lower step is in the right
place. The end support has been cleaned up with a file and the wire
on the bottom of the upper footstep has been filed flat to represent
the bracket on the prototype. |
I am pleased with
the way these little carriages turned out (and so was the customer and
that matters to me more than what I think!). They take me back to a time
when our railways really were the way that people moved about. They will
take their place on a lovely layout, currently under construction, which
portrays a secondary London terminus as it may have looked in the 1890s.
A loco has been built to haul them and another loco and a rake of LB&SCR
4-wheelers are next. I have enjoyed building them too, which matters to me! One of the joys of making things for other people is that you get a chance to build things that you would normally never consider. You can get involved with all sorts of diverse projects without feeling guilty about deserting, in my case, my beloved Great Central! |
|
|
||
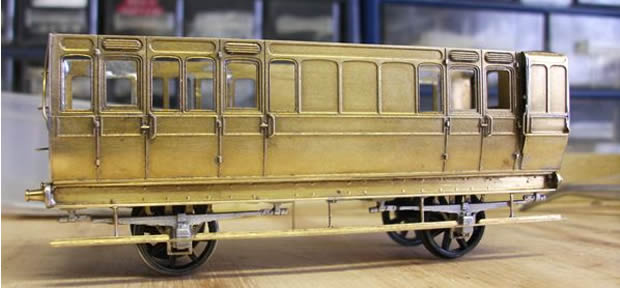
| The end compartment brake third built up and now mounted on the underframe. One interesting feature is that the brake carriages have welded spoke wheels, whereas all the others have the wooden disc variety. When the carriages were first built it was before the days of continuous brakes and only the brake carriages had any form of brake at all. Perhaps that is the reason but I am not certain. Later, Westinghouse brakes were fitted, but for modelling purposes the only visible parts are the brake hangers and blocks, which makes life a little easier. | ||
|
|
||
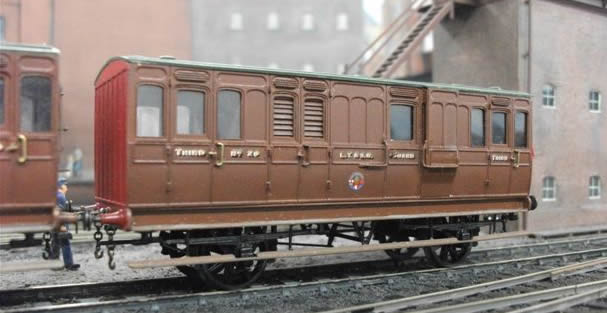
| The centre compartment brake third, finished and ready for service. Many of these carriages ran in fixed sets and some were close coupled. The ends of brake carriages were painted red. even the inner end of the fixed sets. If anybody has come up with a practical way of connecting those safety chains, I would love to hear it! This view shows the louvres on the luggage compartment | ||